The first time I ever built a Docker image, it worked. The container started,
port mapped, and the app responded in the browser. But if I’m being
honest, I couldn’t clearly explain what happened between docker build
and seeing that response.
I understood the commands, but I did not fully understand the flow.
In this write-up, I will walkthrough a small application from source code to a running container on a remote server and explain what is happening at each stage.
Starting with the application
Before Docker gets in the picture, there is just a regular python application:
from flask import Flask
app = Flask(__name__)

@app.route("/")
def home():
    return "Container is working"

app.run(host="0.0.0.0", port=5000)
Here, the app binds to 0.0.0.0 so it listens on all interfaces inside the container. If it binds to localhost, it technically runs, but it becomes isolated within the container’s own network namespace.
Defining how the app is packaged
Create a Dockerfile in the same directory:
FROM python:3.11-slim
WORKDIR /app
COPY app.py .
RUN pip install flask
CMD ["python", "app.py"]
Each line here has a specific purpose.
FROM python:3.11-slim
This sets the base image, instead of installing Python manually, we start from an image that already has Python installed. The slim variant gives us a smaller, slimmer image.
WORKDIR /app
This creates a directory inside the container and sets it as the working directory. Any commands that follow run relative to /app.
COPY app.py .
This copies the app.py file from the current directory on the machine into /app inside the image. The dot refers to the current working directory inside the container.
RUN pip install flask
This installs Flask inside the image during build time. Whatever happens in a RUN instruction becomes part of the image layer.
CMD ["python", "app.py"]
This defines the default command that runs when a container starts from this image.
At this point, the directory on your machine looks like this:
Directory structure:
app.py
Dockerfile
Building the image
Build the image:
docker build -t myapp:1.0 .
The trailing dot tells Docker to use the current folder as the build context. During the build, Docker can only access files inside that folder. If the Dockerfile says COPY app.py . and app.py isn’t in that folder, the build fails. Docker uses the current directory and sends its contents to the Docker daemon for processing.
The docker command by itself is just a client. The actual work happens in the Docker daemon, which runs in the background. On macOS and Windows, Docker Desktop starts the daemon. If Docker Desktop isn’t running, docker build fails because there’s nothing processing the request.
When the daemon reads the Dockerfile, it executes each instruction in order. Every instruction creates a layer. Those layers are cached, which is why rebuilding after small changes is usually faster.
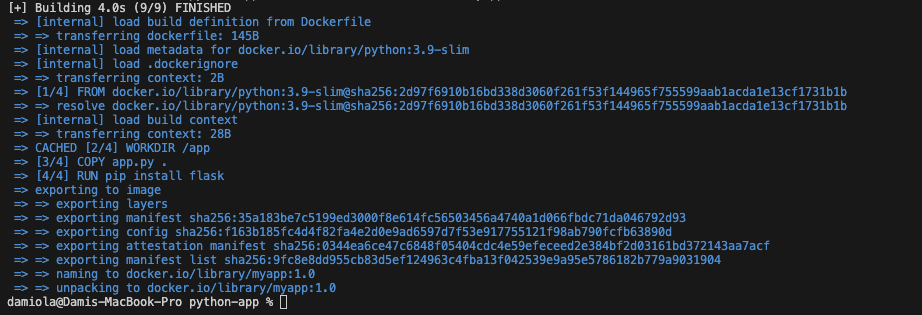 Docker processing the Dockerfile instructions and tagging the resulting image as
 myapp:1.0.
Confirm the image exists:
docker images

Local image list showing myapp:1.0 and its corresponding image ID.
Running the container locally
Run the image:
docker run -d --name myapp-test -p 8080:5000 myapp:1.0
I usually run the image in detached mode to prevent it from hijacking my terminal. The container runs in the background and I can keep using the shell.
Inside the container, the app listens on port 5000. The -p 8080:5000 option maps port 8080 on the host machine to port 5000 on the container, which is why we access it through localhost:8080.
On the browser, visit:
http://localhost:8080

Browser image showing Container working at localhost:8080
Make sure the port in the app.py file matches the container port being published. If the app is running on port 80 but we publish 8080:5000, nothing will respond because Docker will forward traffic to a port where nothing is listening.
You can always confirm what the app is actually using by checking:
docker logs myapp-test

Container logs showing the Flask server running and listening on the configured port
Tagging and pushing to Docker Hub
Before pushing the image, it needs to be tagged with your Docker Hub username:
docker tag myapp:1.0 username/myapp:1.0
This creates a new reference to the same image under your Docker Hub namespace.
Confirm by running:
docker images
The result should be something like:
myapp:1.0username>/myapp:1.0
Push the image:
docker push username/myapp:1.0
This uploads the image layers to Docker Hub and can be pulled from other machines.
Understanding Tags
Tags are simply labels pointing to an image ID.
When we run:
docker build -t myapp:1.0 .
Docker builds the image and attaches 1.0 to it. But that tag isn’t permanent in the way one might assume.
If I decide to rebuild later with the same tag, Docker creates a new image and simply moves 1.0 to point to the new one. The old image doesn’t disappear, but the tag now references something different.
So if we push myapp:1.0 to Docker Hub and later rebuild and push again with that same tag, we’ve effectively changed what 1.0 means. Anyone pulling 1.0 after that gets the newer build, even though the tag didn’t change.
This might not be a problem for a quick local work or labs, but once images start moving between machines, that kind of ambiguity can get messy. So using unique tags like 1.0.1 or even a commit SHA keeps things cleaner and easier for everybody
Running it on a remote server
To prove the image isn’t tied to my local machine, I spun up a small EC2 instance with Docker installed.
On the EC2 instance:
docker pull username/myapp:1.0
docker run -d -p 8080:5000 username/myapp:1.0
Right at this point, I had a DevOps moment. I built the image on an M series Mac and pushed it to Docker Hub, but when I tried to pull it on EC2, it failed with “no matching manifest for linux/amd64”. The image was built for arm64, but the EC2 instance was amd64. I had to rebuild the image as a multi-arch so it works everywhere:
docker buildx build \
  --platform linux/amd64,linux/arm64 \
  -t justdami/myapp:1.0 \
  --push .
This way, DockerHub stores both versions under the same tag, and each machine pulls the correct one automatically.
Once this is solved, the docker pull command downloads the image layers from Docker Hub. The server doesn’t need the source code, all it needs is the image.
The docker run command works the same way it did locally. Port 8080 on the EC2 instance is mapped to port 5000 inside the container.
Two things have to be correct for this to work:
-
The EC2 security group must allow inbound traffic on port 8080.
-
The app inside the container must be listening on
0.0.0.0, notlocalhost.
Once these have been confirmed or fixed, visit:
http://<public-ip>:8080

Browser hitting EC2 public IP showing running container
returns the same response as it did locally.
The image we built earlier is now running on a completely different machine, without copying source code or installing dependencies manually.
A few things that can break
A few things tripped me up while doing this.
If the container runs but the browser fails, the app is usually bound to localhost instead of 0.0.0.0. The container is up, but nothing outside it can reach the process.
If the build feels slow for no reason, it’s often the build context. Docker sends the entire directory to the daemon. Without a .dockerignore, it can include way more than we intended.
If it works locally but not on EC2, check the security group first. Docker can expose a port, but AWS still has to allow traffic to reach it.
Architecture can also bite us. I built the image on an M-series Mac, which defaults to arm64. My EC2 instance was amd64. When I tried pulling the image, it failed with “no matching manifest for linux/amd64.” Rebuilding with --platform linux/amd64 fixed this.
And tags are easy to misuse. Rebuilding with the same tag just moves the label to a new image. Without deliberate versioning, it becomes harder to know exactly what is running in each environment.
The full lifecycle
- Write the application
- Define how it is packaged
- Build an image composed of layers
- Tag it with a version
- Push it to a registry
- Pull and run it on a server
Seeing the entire flow in one place makes Docker easy to reason about. The same image we built locally is the one running on the server. Nothing was reinstalled and nothing was manually configured on the remote machine. The image carried everything it needed.