Recently, my team was working on installing ArcGIS Pro on multiple machines. We got complaints from some users who couldn’t access the software because of licensing and permission issues, while other users had everything working smoothly.
That situation got me thinking about configuration management. If we already had machines where ArcGIS Pro was installed and working in the state we wanted, how could we make sure the other machines were configured consistently instead of troubleshooting them one at a time?
Then I thought, “Ahh, Ansible!” And that led me to writing about this today.
I know, I know!! Configuration management feels less interesting compared to things like Kubernetes or Terraform, but this situation reminded me that every tool has its place. Sometimes you don’t really understand why a tool matters until you run into the problem it was designed to solve.
Ansible is an agentless configuration management and automation tool.
What does configuration management actually look like? Why would I use Ansible instead of SSHing into a server and running commands myself? Where does it fit beside Terraform, Docker, and Kubernetes?
I decided to answer these questions by building something simple and writing about it.
The plan: create a few Linux servers, designate one as an Ansible control node, and use it to configure the others as web servers without manually configuring each one.
By the end, I had something like this:
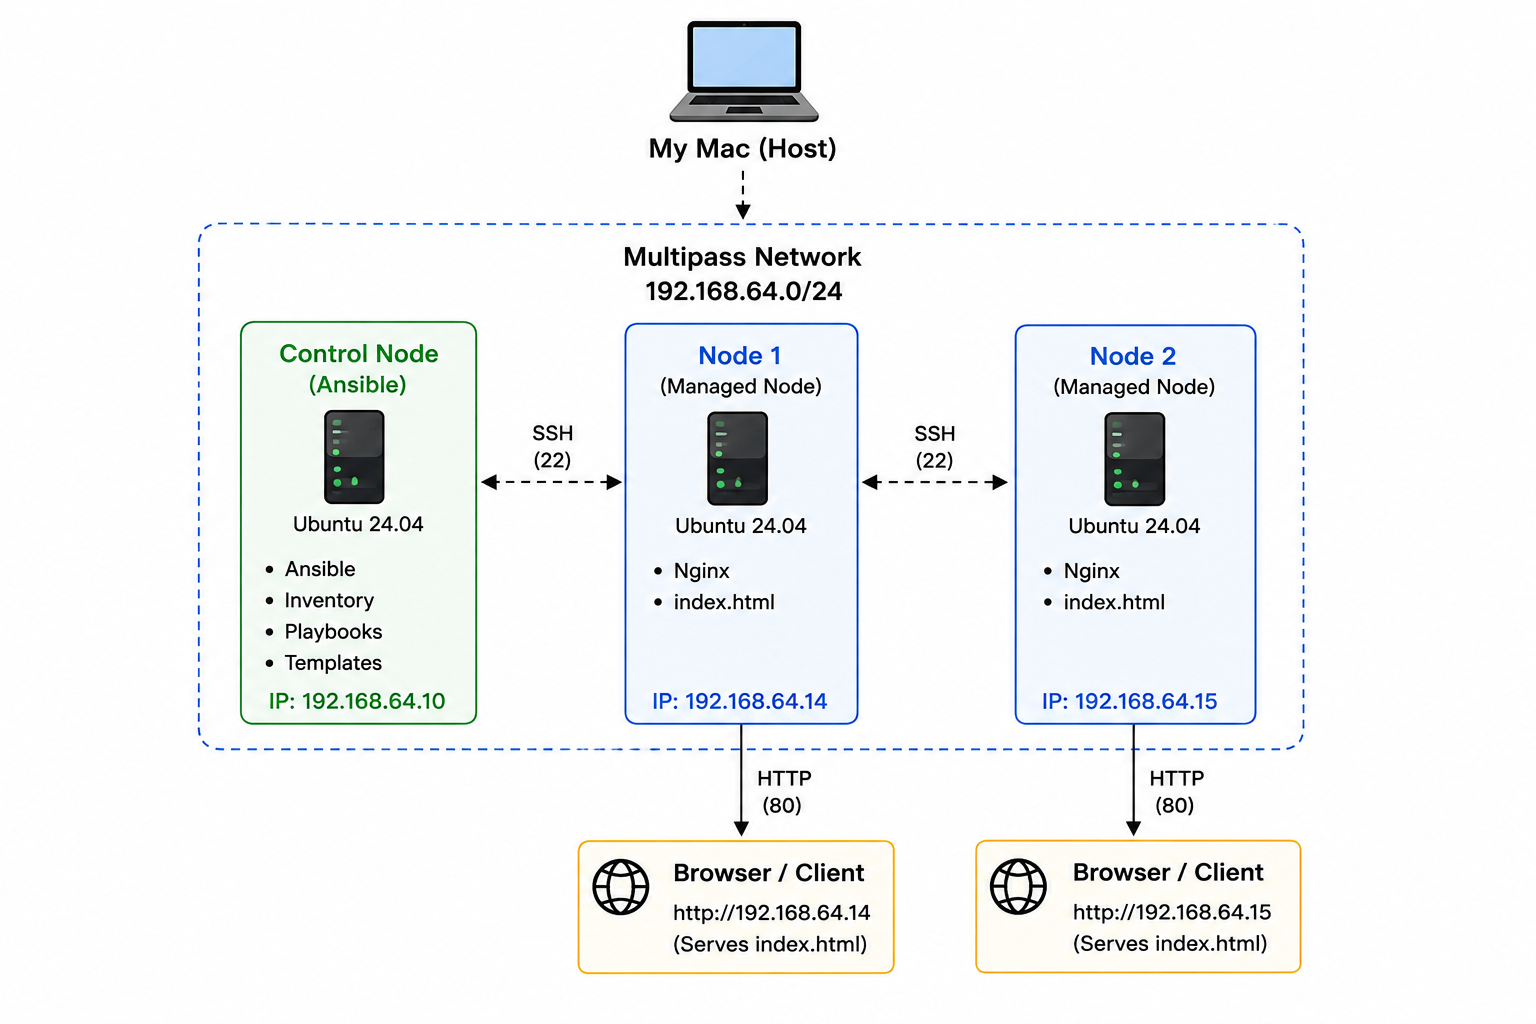
The environment consisted of:
- My Mac as the physical host
- Multipass for the virtual machines
- One Ubuntu VM as the Ansible control node
- Two Ubuntu VMs as managed nodes
- Nginx running on both managed nodes
- SSH providing communication between Ansible and the managed servers
You Need Multiple Servers for Ansible to Make Sense
With one Linux server, automation feels unnecessary.
If I want Nginx installed, I could simply SSH into it:
ssh ubuntu@server-ip
and run:
sudo apt update
sudo apt install nginx
Even with two servers, I could probably tolerate doing the same thing twice.
It becomes a larger problem as the number of servers grows, just like the situation I had at work.
Imagine configuring about 50 machines.
Will I install the same packages on all 50?
Will I enable the service on every server?
Will somebody manually edit one configuration file six months later?
Are the servers that are supposed to be identical still identical?
These are the things that make configuration management important.
Instead of having to run the same commands on 5 or 50 different machines, Ansible lets me think along the lines of:
These packages should be installed.
This service should be running.
This file should exist in this location.
It then compares the current system with the state I described and makes whatever changes are necessary. This becomes important when talking about idempotency. I will explain that as we proceed.
Building the Environment
Since I was doing this lab on my Mac, I needed a way to create a few Linux machines locally. I decided to use Multipass, which lets me quickly spin up Ubuntu virtual machines without setting up a heavier virtualization environment.
I installed Multipass on my Mac using Homebrew:
brew install --cask multipass
After installation, I confirmed it was working:
multipass version
From there, I created three Ubuntu virtual machines:
control
node1
node2
control was my Ansible control node, while node1 and node2 were the machines I wanted Ansible to manage.
Then I continued into VM creation with:
multipass launch lts \
  --name node1 \
  --cpus 1 \
  --memory 1G \
  --disk 10G
I repeated the process for node2 and control, although I gave the control node 2 GB of memory.
On the control node, I installed Ansible:
sudo apt update
sudo apt upgrade -y
sudo apt install ansible -y
I did not install Ansible on node1 or node2.
The managed machines do not need an Ansible agent constantly running on them. My control node connects to them over SSH and performs the work from there.
So before I could really do anything useful with Ansible, I needed SSH working properly.

SSH First, Ansible Second
On the control node, I generated an Ed25519 SSH key:
ssh-keygen -t ed25519
This gave me a private key and a public key.
The private key remains private on the control node, while the public key is placed on the machines I want to access.
On each managed node, that public key goes into:
~/.ssh/authorized_keys
Once that was configured, I could SSH from control into the nodes without entering a password every time.
ssh ubuntu@<node-ip>
If the control node cannot authenticate to the managed machine, Ansible is not going to save me.
I also had to set the correct SSH permissions:
chmod 700 ~/.ssh
chmod 600 ~/.ssh/authorized_keys
700 means only the owner can read, write and access the .ssh directory.
600 means only the owner can read and write authorized_keys.
SSH is intentionally picky about permissions around these files.
Later in this project, I ended up learning a lot more about SSH because I broke the lab and recreated my nodes. I will save that story for Part 2.
Inventory: Ansible Needs to Know Who It Is Managing
Once SSH worked, I needed to tell Ansible which machines it should manage.
That is the inventory.
I think of the inventory as Ansible’s map or address book.
Mine looked roughly like this:
[webservers]
node1 ansible_host=192.168.x.14 ansible_user=ubuntu
node2 ansible_host=192.168.x.15 ansible_user=ubuntu
node1 and node2 are the names I want to use inside Ansible.
ansible_host is the actual address Ansible uses to reach the machine.
If the IP address changes, I can update the inventory without rewriting the rest of my automation.
I also used an ansible.cfg file so I did not have to keep specifying the same project settings every time I ran Ansible.
At a high level:
inventory.ini  -> Who am I managing?
ansible.cfg    -> How should Ansible behave for this project?
Parent and Child Groups
While working on inventories, I thought to write about parent and child groups.
For example:
[webservers]
web01
web02

[databases]
db01
db02

[production:children]
webservers
databases
I usually think of this as a grandfather, parent and kids situation.
In Ansible terms, production is the parent group and webservers and databases are child groups.
production
├── webservers
│   ├── web01
│   └── web02
└── databases
    ├── db01
    └── db02
Now I could target only the web servers, or target production and include everything underneath it.
I did not need this complexity for my two-node project, but I just thought to write about it because it would become useful when inventories get larger.
Can Ansible Actually Reach the Machines?
Before writing a playbook, I tested connectivity:
ansible all -m ansible.builtin.ping
Both nodes returned pong.
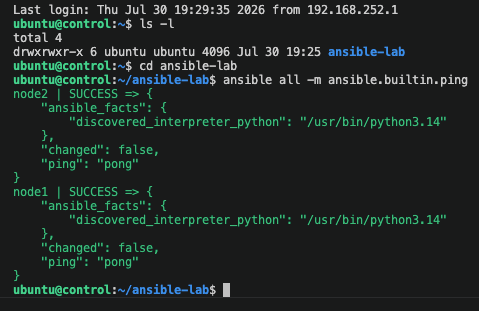
This is different from the regular Linux ping command.
ping <ip-address>
A normal ping mainly tells me whether a machine is reachable over ICMP.
Ansible’s ping is testing if my control node could manage the worker nodes:
Inventory
   ↓
SSH
   ↓
Authentication
   ↓
Python/module execution
   ↓
pong
So a successful Ansible ping meant my control node could actually manage the machines.
Ad Hoc Commands: When I Don’t Need a Whole Playbook
Before getting into playbooks, I used ad hoc commands.
For example:
ansible webservers -m ansible.builtin.command -a "uptime"
Expect something like:
ansible <host-pattern> -m <module> -a "<arguments>"
This is useful when I want to do something once.
Check uptime.
Check disk space.
Run a quick command across several servers.
A playbook is different, it is something I want to preserve, repeat and treat as part of the configuration of my environment.
The Playbook
The main playbook for this project looked roughly like this:
---
- name: Configure web servers
  hosts: webservers
  become: true

  tasks:
    - name: Update the APT package cache
      ansible.builtin.apt:
        update_cache: true
        cache_valid_time: 3600

    - name: Install required packages
      ansible.builtin.apt:
        name: "{{ common_packages }}"
        state: present

    - name: Ensure web service is running and enabled
      ansible.builtin.service:
        name: "{{ web_service }}"
        state: started
        enabled: true

    - name: Deploy the server-specific web page
      ansible.builtin.template:
        src: ../templates/index.html.j2
        dest: "{{ web_root }}/index.html"
        owner: root
        group: root
        mode: "0644"
      notify: Restart Nginx

  handlers:
    - name: Restart Nginx
      ansible.builtin.service:
        name: "{{ web_service }}"
        state: restarted
There is a lot going on in what is still a pretty small playbook, so I will break it down piece by piece.
Modules Are Basically Things Ansible Knows How to Do
A module is basically a capability Ansible can use to perform an operation.
Some examples I worked with were:
apt
dnf
service
user
file
template
uri
command
assert
Take this:
ansible.builtin.apt:
  name: nginx
  state: present
I am telling it that:
Nginx should be present.
And if it isn’t:
Run
apt install nginx.
If Nginx is already installed, Ansible does not need to install it again.
I can also inspect a module instead of guessing its options:
ansible-doc ansible.builtin.user
Variables: Stop Hardcoding Everything
Instead of hardcoding everything inside the playbook, I defined values separately:
common_packages:
  - nginx
  - curl
  - git
  - unzip

web_service: nginx
web_root: /var/www/html
Then I could reference them:
name: "{{ common_packages }}"
or:
name: "{{ web_service }}"
or:
dest: "{{ web_root }}/index.html"
For this project, shared values for the web servers lived in:
group_vars/webservers.yml
One thing I had to correct in my own understanding was the idea that variables in a playbook “have to be dictionaries.”
vars: in a YAML playbook is a mapping of variable names to values, but an individual value can be a string, list or dictionary.
For example:
vars:
  web_service: nginx

  packages:
    - nginx
    - curl

  user_details:
    username: bob
    email: bob@example.com
Three variables. Three different types of values.
A Dictionary Is Not the Same Thing as a Module Parameter
This became clear to me when I broke a lab exercise.
I had data that looked something like this:
user_details:
  username: bob
  password: something
  email: bob@example.com
So I wrote:
ansible.builtin.user:
  name: "{{ user_details.username }}"
  password: "{{ user_details.password }}"
  email: "{{ user_details.email }}"
  state: present
Ansible responded with:
Unsupported parameters for (ansible.builtin.user) module: email
It was confusing because user_details.email is valid.
I can create whatever keys make sense inside my own dictionary, but that does not mean an Ansible module has parameters with those same names.
The user module does not accept an email parameter.
That is where this became useful:
ansible-doc ansible.builtin.user
I read the error and checked the module documentation.
Loops, item, and Code That Worked but Was Still Wrong
Suppose I have:
fruits:
  - Apple
  - Banana
  - Grapes
  - Orange
I can do:
- name: Print each fruit
  ansible.builtin.command: 'echo "{{ item }}"'
  loop: "{{ fruits }}"
Ansible automatically creates item as the current value:
item = Apple
item = Banana
item = Grapes
item = Orange
Then I wrote something like this in another exercise:
packages:
  - httpd
  - make
  - vim

tasks:
  - name: Install packages
    ansible.builtin.dnf:
      name: "{{ packages }}"
      state: present
    loop: "{{ packages }}"
This worked, but the problem is that the loop was doing absolutely nothing useful. Idempotency saved me here.
I told Ansible to loop through packages, but then I passed the entire packages list to the module on every iteration.
Essentially:
iteration 1 -> [httpd, make, vim]
iteration 2 -> [httpd, make, vim]
iteration 3 -> [httpd, make, vim]
If I actually wanted a loop:
ansible.builtin.dnf:
  name: "{{ item }}"
  state: present
loop: "{{ packages }}"
But dnf can already accept a list, so this is even cleaner:
ansible.builtin.dnf:
  name: "{{ packages }}"
  state: present
That taught me something I want to remember:
Automation producing the correct result does not automatically mean the automation was written well.
Facts and Conditionals
Every time my playbook ran, I saw:
TASK [Gathering Facts]
Ansible can collect information about the machine it is managing, including things like:
Operating system
Distribution
Hostname
IP addresses
Architecture
Memory
Network interfaces
I could see the gathered information with:
ansible all -m ansible.builtin.setup
Those facts can then be used like variables.
For example:
{{ ansible_distribution }}
And I can use a fact in a conditional:
when: ansible_distribution == "Ubuntu"
Now the automation can make decisions depending on the machine it is running against.
This is where I started seeing how one playbook could eventually support different types of systems instead of assuming every server is identical.
Templates: One File, Different Servers
I wanted both web servers to have a webpage, but I also wanted the page to identify the machine serving it.
I could have made two separate HTML files.
Instead, I created one Jinja2 template:
templates/index.html.j2
with values such as:
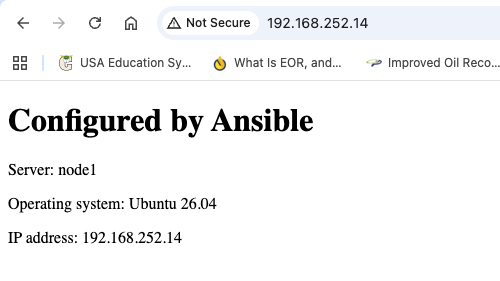
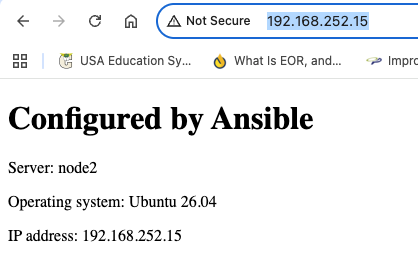
<h1>Configured by Ansible</h1>
<p>Server: {{ inventory_hostname }}</p>
<p>Operating system: {{ ansible_distribution }} {{ ansible_distribution_version }}</p>
<p>IP address: {{ ansible_default_ipv4.address }}</p>
The same template is rendered differently depending on the machine.
On node1:
{{ inventory_hostname }} -> node1
On node2:
{{ inventory_hostname }} -> node2
This also helped me understand copy versus template.
copy puts a file on the target as it is.
template renders the Jinja expressions first and then places the resulting file on the target.
Wait, Why Does Typing the IP Show My HTML?
My template task placed the file here:
dest: "{{ web_root }}/index.html"
and:
web_root: /var/www/html
So the rendered file ended up at:
/var/www/html/index.html
Nginx serves its default site from that web root.
So when I typed the node IP into my browser, what was really happening was:
Browser
   ↓
HTTP request to node IP
   ↓
Nginx
   ↓
/var/www/html/index.html
   ↓
HTML response
Ansible installed and managed Nginx and put my rendered file where Nginx knew to find it.
Handlers: Restart Nginx Only When Something Changes
My template task had this:
notify: Restart Nginx
And later:
handlers:
  - name: Restart Nginx
    ansible.builtin.service:
      name: "{{ web_service }}"
      state: restarted
A handler is a special task that gets triggered when another task reports a change.
If the template does not change:
template -> ok -> no handler -> no restart
If the template changes:
template -> changed -> notify -> restart Nginx
There is no human sitting there approving the restart.
The task changed, so the handler gets notified.
That is better than restarting Nginx every single time I run the playbook whether it needs it or not.
Now Idempotency Makes Sense
Remember earlier when I said Ansible describes the state I want?
This is where idempotency comes in.
The first time I ran the playbook, Ansible needed to make changes.
I would see:
changed
Then I ran the same playbook again.
Most tasks came back:
ok
Why?
Because if:
Desired state = Nginx installed
Current state = Nginx installed
there is nothing to do.
Ansible does not need to reinstall Nginx just because I ran the playbook again.
That is idempotency.
I also added:
cache_valid_time: 3600
to the APT cache task so a recently refreshed package cache did not need to be refreshed again immediately.
Deployment Passed. But Does the Website Actually Work?
I did not want the playbook finishing successfully to be my only proof that the application worked.
So I made a separate verification playbook.
It used the uri module to request the webpage:
- name: Check the Nginx endpoint
  ansible.builtin.uri:
    url: "http://{{ ansible_host }}"
    return_content: true
    status_code: 200
  register: webpage
register captures the result of a task and stores it in a variable.
Then I could test that result:
- name: Confirm expected page content
  ansible.builtin.assert:
    that:
      - "'Configured by Ansible' in webpage.content"
      - "inventory_hostname in webpage.content"
    success_msg: "{{ inventory_hostname }} passed verification"
    fail_msg: "{{ inventory_hostname }} failed verification"
Both nodes eventually returned:
node1 passed verification
node2 passed verification
A configuration task completing successfully lets me know that Ansible completed the task.
It does not necessarily prove that the application is reachable and doing what I intended.
So I tested that too.
So Where Does Ansible Fit?
The way I separate them in my head is:
Terraform
I need these infrastructure resources to exist.
Ansible
Those machines exist. Configure them like this.
Docker
Package this application and its dependencies.
Kubernetes
Run and manage containerized workloads across a cluster.
There is obviously overlap in the real world.
What to take away from this write-up
My Ansible mental model looks like this:
Inventory     -> What machines am I managing?
Playbook      -> What state do I want them in?
Modules       -> What capability should Ansible use?
Variables     -> What values can change without rewriting everything?
Facts         -> What does Ansible know about this machine?
Conditionals  -> When should this task run?
Loops         -> What should this task operate on repeatedly?
Templates     -> How can one file adapt to different hosts?
Handlers      -> What should happen only when something changes?
Idempotency   -> Is the machine already in the state I want?
Verification  -> Did the thing I configured actually work?
The project is simple: one control node and two web servers, and this was enough for me to connect a lot of Ansible concepts.
In part 2 of this, I will write about how I broke this lab and fixed it.